If you’re wondering “How to leave a Facebook group,” you’re not alone. Many users find themselves part of Facebook groups that no longer align with their interests or preferences. Leaving a group can help declutter your social media feed and tailor your online experience to better suit your current interests. Whether you’re using Facebook on a desktop or mobile device, the process is simple and can be done in just a few clicks. This guide will provide you with clear, step-by-step instructions on how to leave a Facebook group, ensuring you can manage your digital presence with ease and efficiency.
To leave a Facebook group, follow these steps:
1. Open Facebook: Log in to your Facebook account if you aren’t already.
2. Navigate to the Group: Go to the Facebook group you want to leave. You can find your groups in the left sidebar on the Facebook homepage.
3. Click on the Group: Click on the group’s name to enter the group.
4. Leave the Group: Once you are inside the group, click on the “Joined” button (or a similar button depending on your group’s settings). This button is typically located below the cover photo of the group.
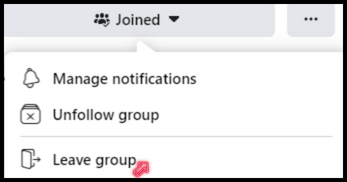
5. Confirm Leaving: A dropdown menu will appear. Click on “Leave Group.” Facebook will then ask you to confirm that you want to leave the group.
6. Confirm Again: In a pop-up window, you will be asked to confirm your decision. Click on “Leave Group” again to confirm.
Once you’ve completed these steps, you will no longer be a member of the Facebook group, and you’ll stop receiving updates from it in your news feed. Your departure from the group will be noted in the group’s activity log, but your posts and comments made in the group will still remain unless you manually delete them.
Certainly, here are a few more details and considerations when leaving a Facebook group:
1. Notification: After leaving a Facebook group, you will no longer receive notifications for group activities, and the group’s posts will not appear in your News Feed.
2. Returning to the Group: If you ever want to rejoin the group, you can search for it and click the “Join Group” button if it’s a public or closed group. For secret groups, you’ll need an invitation from a current member or admin.
3. Archiving Group Content: Leaving a group does not automatically remove your previous posts and comments from the group. Your past contributions to the group will still be visible unless you manually delete them.
4.Member Removal: Group admins have the authority to remove members from the group. If you leave a group voluntarily, it’s different from being removed by an admin.
5.Group Privacy: The privacy settings of a group can affect who can see that you’re a member of the group. In some cases, leaving a secret group might not be visible to others, but leaving a public or closed group will typically be visible to your friends.
6. Blocking Group Members: If you’ve had negative interactions with specific members of the group, you can block them. Blocking a user will prevent them from seeing your profile and interacting with you on Facebook.
7. Reporting Inappropriate Content: If you’re leaving a group because of inappropriate content or behavior, consider reporting it to Facebook through the platform’s reporting tools.
Remember that Facebook’s interface and features may change over time, so while these instructions are accurate as of my last knowledge update in September 2021, they may be subject to minor changes. Always check Facebook’s Help Center or Community Standards for the most up-to-date information on managing groups and your account settings.